In this short article, we will discuss how to create an AWS cloud server. So, if you are creating an AWS cloud server, you need to remember a few things. It involves several things such as setting up an AWS account, configuring security settings, launching EC2 instances, and connecting to your server. However, in this article, you can see every step that we are using to create an AWS server.
How to Create an AWS Cloud Server
If you are going to build an Amazon Web Services (AWS) cloud server, there are some important points to consider. Amazon Web Services (AWS) provides a great platform for hosting and managing servers, with its Elastic Compute Cloud (EC2) service being the cornerstone for launching a cloud server. Here are the step-by-step points for building an AWS cloud server.
1. First you have to create your AWS account.
- Go to AWS websites.
- Click on Create an AWS account.
- Enter your email address and choose a unique AWS account name.
- After entering the email address and name of the AWS account, then you receive an email verification code. So for the forward process, you have to enter an email verification code.
- After verification of your email choose a strong password.
- Now click on login to the AWS account, and provide your email address and password to sign in AWS account.
- Now fill in your full name, company name (if applicable), and phone number.
- Enter your country/region, address, and postal code.
- Choose the account Type, and choose “Personal” or “Professional” based on your usage.
- Enter Payment Information, and provide your credit or debit card details. AWS requires a payment method for identity verification and potential charges, although there are free tier options available.
- Enter your billing address details.
- AWS will send a verification code to your phone number. Enter the code to verify your identity.
- AWS offers several support plans. For most users, the “Basic” support plan, which is free, is sufficient to get started.
- The “Developer” and “Business” plans offer additional support features for a monthly fee.
- Review your details and confirm your account setup.
- After completing the registration, you will receive a confirmation email from AWS.
- Finally, you created your AWS account.
2. Setup Your Security Settings
- Log in to your AWS account, and go to the AWS Management Console.
- To set up IAM Users and Roles go to the IAM (Identity and Access Management) Dashboard.
- Create a new user with administrative privileges:
- Click “Add user.”
- Enter a username and select “Programmatic access” and “AWS Management Console access.”
- Attach the “AdministratorAccess” policy.
- Create groups and roles if needed for better access control.
- Now create setup security groups.
- Security groups act as virtual firewalls for your EC2 instances.
- Go to the EC2 Dashboard and click on “Security Groups.”
- Create a new security group. And in security groups add inbound rules to allow SSH (port 22) for connecting to your server and HTTP (port 80) and HTTPS (port 443) if you plan to host web services.
3. Launch an EC2 Instance
- Go to the EC2 Dashboard from the AWS Management Console, and go to “Services” > “EC2.”
- Click “Launch Instance.”
- Choose an Amazon Machine Image (AMI).
- Select an appropriate AMI, such as “Amazon Linux 2 AMI” or “Ubuntu Server.”
- Choose an Instance Type.
- For general purposes, the “t2.micro” instance (free tier eligible) is a good start.
- Configure Instance Details.
- Accept the default settings for a basic setup.
- Add storage to Specify the storage volume size and type.
- Add tags to help identify your instance (e.g., Name: MyDigiworkeasyServer).
- Select an existing security group or create a new one.
- Review your instance setup and click “Launch.”
- Choose an existing key pair or create a new one.
- This key pair will be used to SSH into your server. Download the private key (.pem) file and store it securely.
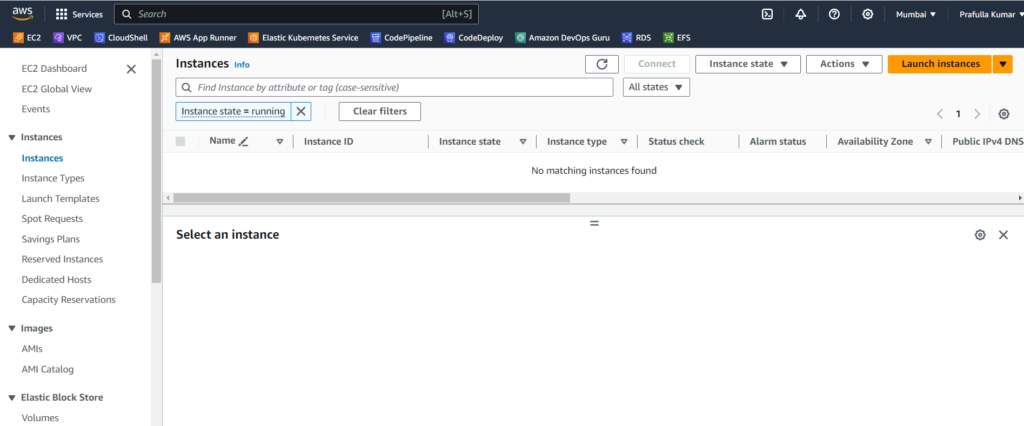
4. Connect to Your EC2 Instance
- Go to the EC2 Dashboard and click on “Instances” to see your running instances.
- Select your instance and note the Public DNS (IPv4) address.
- Connect via SSH.
- Open a terminal (Linux/Mac) or a tool like PuTTY (Windows).
- Ensure your private key file has the correct permissions (Linux/Mac).
bash
chmod 400 path/to/your-key-pair.pem
- Connect to your instance.
bash
ssh -i "path/to/your-key-pair.pem" ec2-user@your-instance-public-dns
- For Ubuntu instances, use Ubuntu as the username.
bash
ssh -i "path/to/your-key-pair.pem" ubuntu@your-instance-public-dns
5. Configure Your Server
- Once connected, update the package lists and upgrade the system.
bash
sudo yum update -y # For Amazon Linux
sudo apt update && sudo apt upgrade -y # For Ubuntu
- Install Necessary Software like web servers, databases, or any other software you need.
bash
sudo yum install httpd -y # For Apache on Amazon Linux
sudo apt install apache2 -y # For Apache on Ubuntu
- Start and Enable Services and make sure your services start on boot.
bash
sudo systemctl start httpd
sudo systemctl enable httpd
Finlay your AWS cloud server is created successfully.
Conclusion on how to create a cloud server in AWS
Creating an AWS cloud server involves setting up an AWS account, configuring security settings, launching an EC2 instance, and connecting to your server. AWS provides a scalable and flexible platform to host your applications and websites. By following this guide, you will be able to launch a cloud server on AWS in no time. Always remember to secure your server and back up your data regularly to ensure smooth and secure operation.
Also, we provide the best AWS Services. Our team has experts with vast AWS experience, dedicated to delivering a wide range of cloud computing services. We empower businesses of all sizes to innovate, grow, and scale by leveraging the full power of Amazon Web Services (AWS). Whether you need computing power, storage solutions, database services, machine learning capabilities, IoT (Internet of Things) solutions, or more, we have you covered.